Getting Started with BPI-R4
Contents
Development
Basic Development
Prepare to develop
 * Prepare 8G/above TF card, USB-Serial cable, Ubuntu System
 * Using your USB-Serial cable(3.3V TTL,Baud=115200) Connect to debug console on BPI-R4
   G=GND;  RX=BPI-R4 input;  TX=BPI-R4 output


* BPI-R4 bootstrap and device select Jumper Setting
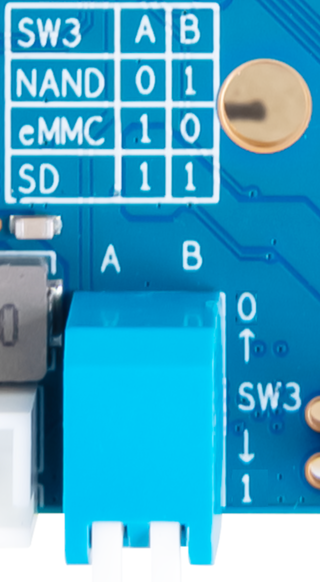

* Examples:
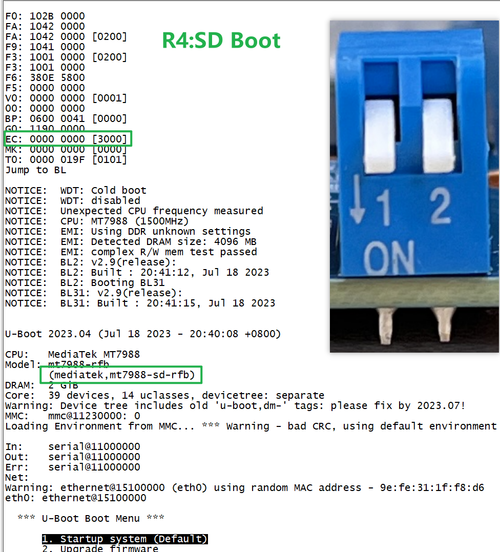
1. All Jumper is "1", BPI-R4 will boot from SD card

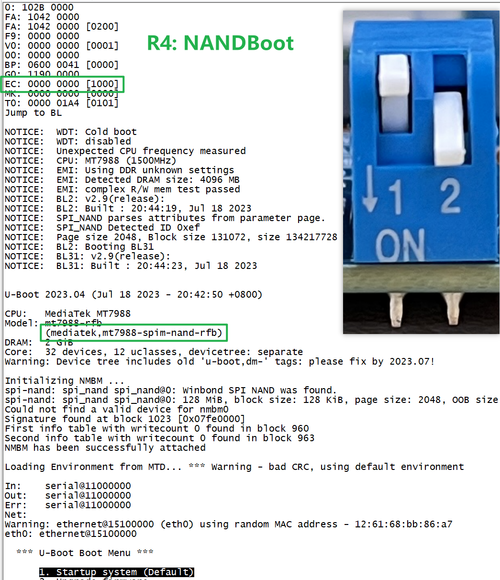
2. SW3-A is "0" and SW3-B is "1" , BPI-R4 will boot from SPI NAND

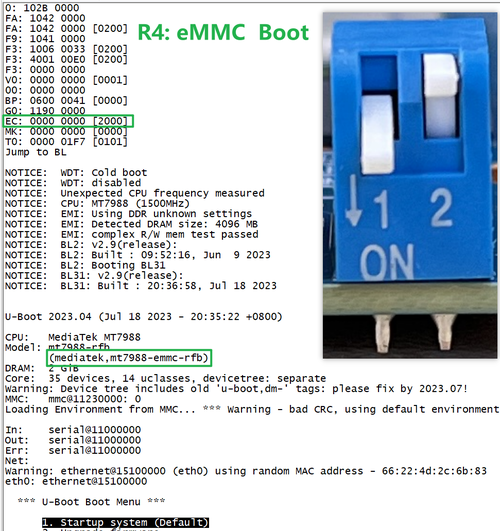
3. SW3-A is "1" and SW3-B is "0" , BPI-R4 will boot from eMMC

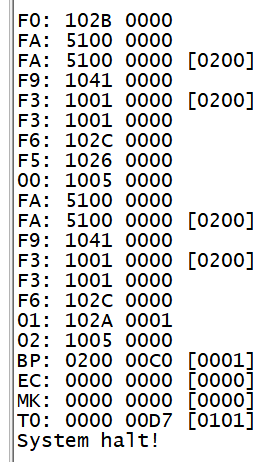
4. If the console said "system halt!", it means that the bootup storage does not cotain any OS

How to burn image to SD card
 A. Note: burn image to SD card on linux computer
   1.You could download latest image from our forum
   * Here is the example image link:

   2.Install bpi-tools on your Ubuntu. If you can't access this URL or any other problems, please go to bpi-tools repo and install this tools manually.
   * apt-get install pv
   * curl -sL https://github.com/BPI-SINOVOIP/bpi-tools/raw/master/bpi-tools | sudo -E bash

   3.After you download the image, insert your TF card into your Ubuntu
   * Execute "bpi-copy xxx.img /dev/sdx" to install image on your TF card

   4.After step 3, then you can insert your TF card into R3, and press power button to setup R3
 B. Note: burn image to SD card on windows computer
   1. Download the tools from the website:   https://sourceforge.net/projects/win32diskimager/
   2. Install the tools into Windows computer.
   3. flash image into SD card.

 C. Change Boot Jumper to boot from SD, Enable SD Card Device.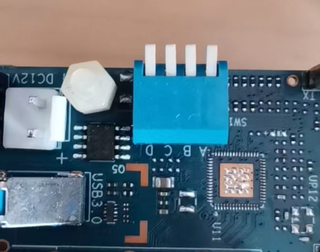

Network-Configuration
- Network-Configuration refer to: http://www.fw-web.de/dokuwiki/doku.php?id=en:bpi-r2:network:start
- Network Interface: eth1, lan0 is for WAN; lan4, rax0, lan2, lan5, ra0, lan3, lan1 is for LAN, ra0 is for 2.4G wireless, rax0 is for 5G wireless.

root@OpenWrt:/# ifconfig
br-lan Link encap:Ethernet HWaddr EE:A1:57:81:CA:19
         inet addr:192.168.1.1  Bcast:192.168.1.255  Mask:255.255.255.0
         inet6 addr: fe80::eca1:57ff:fe81:ca19/64 Scope:Link
         inet6 addr: fd63:8bea:d5ce::1/60 Scope:Global
         UP BROADCAST RUNNING MULTICAST  MTU:1500  Metric:1
         RX packets:0 errors:0 dropped:0 overruns:0 frame:0
         TX packets:15 errors:0 dropped:0 overruns:0 carrier:0
         collisions:0 txqueuelen:1000
         RX bytes:0 (0.0 B)  TX bytes:2418 (2.3 KiB)
br-wan Link encap:Ethernet HWaddr EE:A1:57:81:CA:19
         inet6 addr: fe80::eca1:57ff:fe81:ca19/64 Scope:Link
         UP BROADCAST RUNNING MULTICAST  MTU:1500  Metric:1
         RX packets:0 errors:0 dropped:0 overruns:0 frame:0
         TX packets:34 errors:0 dropped:0 overruns:0 carrier:0
         collisions:0 txqueuelen:1000
         RX bytes:0 (0.0 B)  TX bytes:8538 (8.3 KiB)
eth0 Link encap:Ethernet HWaddr EE:A1:57:81:CA:19
         inet6 addr: fe80::eca1:57ff:fe81:ca19/64 Scope:Link
         UP BROADCAST RUNNING MULTICAST  MTU:1500  Metric:1
         RX packets:0 errors:0 dropped:0 overruns:0 frame:0
         TX packets:32 errors:0 dropped:0 overruns:0 carrier:0
         collisions:0 txqueuelen:1000
         RX bytes:0 (0.0 B)  TX bytes:4408 (4.3 KiB)
         Interrupt:124
eth1 Link encap:Ethernet HWaddr 4A:BB:84:B4:5D:3F
         UP BROADCAST RUNNING MULTICAST  MTU:1500  Metric:1
         RX packets:0 errors:0 dropped:0 overruns:0 frame:0
         TX packets:34 errors:0 dropped:0 overruns:0 carrier:0
         collisions:0 txqueuelen:1000
         RX bytes:0 (0.0 B)  TX bytes:8674 (8.4 KiB)
         Interrupt:124
lan0 Link encap:Ethernet HWaddr EE:A1:57:81:CA:19
         UP BROADCAST MULTICAST  MTU:1500  Metric:1
         RX packets:0 errors:0 dropped:0 overruns:0 frame:0
         TX packets:0 errors:0 dropped:0 overruns:0 carrier:0
         collisions:0 txqueuelen:1000
         RX bytes:0 (0.0 B)  TX bytes:0 (0.0 B)
lan1 Link encap:Ethernet HWaddr EE:A1:57:81:CA:19
         UP BROADCAST MULTICAST  MTU:1500  Metric:1
         RX packets:0 errors:0 dropped:0 overruns:0 frame:0
         TX packets:0 errors:0 dropped:0 overruns:0 carrier:0
         collisions:0 txqueuelen:1000
         RX bytes:0 (0.0 B)  TX bytes:0 (0.0 B)
lan2 Link encap:Ethernet HWaddr EE:A1:57:81:CA:19
         UP BROADCAST MULTICAST  MTU:1500  Metric:1
         RX packets:0 errors:0 dropped:0 overruns:0 frame:0
         TX packets:0 errors:0 dropped:0 overruns:0 carrier:0
         collisions:0 txqueuelen:1000
         RX bytes:0 (0.0 B)  TX bytes:0 (0.0 B)
lan3 Link encap:Ethernet HWaddr EE:A1:57:81:CA:19
         UP BROADCAST MULTICAST  MTU:1500  Metric:1
         RX packets:0 errors:0 dropped:0 overruns:0 frame:0
         TX packets:0 errors:0 dropped:0 overruns:0 carrier:0
         collisions:0 txqueuelen:1000
         RX bytes:0 (0.0 B)  TX bytes:0 (0.0 B)
lan4 Link encap:Ethernet HWaddr EE:A1:57:81:CA:19
         UP BROADCAST MULTICAST  MTU:1500  Metric:1
         RX packets:0 errors:0 dropped:0 overruns:0 frame:0
         TX packets:0 errors:0 dropped:0 overruns:0 carrier:0
         collisions:0 txqueuelen:1000
         RX bytes:0 (0.0 B)  TX bytes:0 (0.0 B)
lan5 Link encap:Ethernet HWaddr EE:A1:57:81:CA:19
         UP BROADCAST RUNNING MULTICAST  MTU:1500  Metric:1
         RX packets:0 errors:0 dropped:0 overruns:0 frame:0
         TX packets:15 errors:0 dropped:0 overruns:0 carrier:0
         collisions:0 txqueuelen:1000
         RX bytes:0 (0.0 B)  TX bytes:2418 (2.3 KiB)
lo Link encap:Local Loopback
         inet addr:127.0.0.1  Mask:255.0.0.0
         inet6 addr: ::1/128 Scope:Host
         UP LOOPBACK RUNNING  MTU:65536  Metric:1
         RX packets:56 errors:0 dropped:0 overruns:0 frame:0
         TX packets:56 errors:0 dropped:0 overruns:0 carrier:0
         collisions:0 txqueuelen:1000
         RX bytes:4368 (4.2 KiB)  TX bytes:4368 (4.2 KiB)
ra0 Link encap:Ethernet HWaddr 00:0C:43:26:60:38
         UP BROADCAST RUNNING MULTICAST  MTU:1500  Metric:1
         RX packets:0 errors:0 dropped:0 overruns:0 frame:0
         TX packets:0 errors:0 dropped:0 overruns:0 carrier:0
         collisions:0 txqueuelen:1000
         RX bytes:0 (0.0 B)  TX bytes:0 (0.0 B)
         Interrupt:6
rax0 Link encap:Ethernet HWaddr 02:0C:43:36:60:38
         UP BROADCAST RUNNING MULTICAST  MTU:1500  Metric:1
         RX packets:0 errors:0 dropped:0 overruns:0 frame:0
         TX packets:0 errors:0 dropped:0 overruns:0 carrier:0
         collisions:0 txqueuelen:1000
         RX bytes:0 (0.0 B)  TX bytes:0 (0.0 B)
root@OpenWrt:/# brctl show br-wan
bridge name bridge id STP enabled interfaces br-wan 7fff.eea15781ca19 no lan0, eth1
root@OpenWrt:/# brctl show br-lan
bridge name bridge id STP enabled interfaces br-lan 7fff.eea15781ca19 no lan4, rax0, lan2, lan5, ra0, lan3, lan1
root@OpenWrt:/#
Accessories
1. 10G SFP Module
The SFP serdes speed of BPI-R4 is fixed at 10Gbps, so only SFP that support this can be used!
Usually the PIN6 of 10G SFP+ module is GND. After inserting the module, SFP_MOD_DEF0 will be pulled low, thereby turning on the SFP power supply.
Therefore, if this PIN of the module is not GND, 3.3V_SFP power will not be supplied!

10G SFP+ Copper Module
The temperature of this module is very high when used for a long time, It can reach 90℃ without a heat sink or cooling fan. Be careful to prevent burns!

.png)
Note:
Do not pull out this module once it is inserted, otherwise it will cause BPI-R4 to reboot.This phenomenon does not exist with other modules.
-Pull_out_reboot.png)
10G SFP+ Fibre Module


2. 4G/5G Module
- BPI-R4 supports 4G LTE EC25. Quectel RM500U-CN & RM520N-GL 5G Modules.
- If you want to use 5G on BPI-R4:
   1. Insert 5G dongle into USB3.0.
   2. Connect RG200U-CN to mini PCIe, connect SoC through USB2.0(speed limited).
   3. Make an RG200U-CN LGA adapter board and insert it into M.2 KEY M.
Note: The availability of 4G/5G depends on the local carrier frequency band.
3. SSD
- please insert one M2.KeyM SSD into M2.KeyM slot.

